 [4]
[4]Again, for this part of the game we are going to be using Early game gear and Skill plan and proceed to the Mid game gear/skill plan, in every Act section you'll find:
- The act walkthrough.
- Mobs to look out for and how to counter them.
- Items to look out for, keep them in mind at all time so you don't have to farm.
► MP VIDEOS

Here we'll have only the videos from the stream for Terror difficulty (Playlist will include all Walkthrough in order). On each Act section I'll put only the youtube parts from SP, so you guys have both. On multimedia you got the full compilation of them. They are posted as well on my Somnus's Lair.
On twitch:
On Youtube!:
► Act 1

Before going any further, you should be around level 65~ (from IotSS/Cows) and have upgraded TU6 Spellgrips + gear MO'ed (gold from IotSS)
So, we are on Terror, and we simply go to Den of evil and go kill Andariel. My advice would be to kill all mobs you can find in order to progress/level more steady and safe.
Don't forget picking up the Monster token (Act1 - Clawstorm Terror: From The Barracks to Catacombs Level 3) and the Boss token (Dogma of suffering).
Mobs to look out for and how to counter them:
Keep in mind that mobs are the same, only change is more HP/DMG/RES%.
- Cave snappers: Kite them away, don't stay in melee or you'll get poison flashed. Shadow refuge + Electrofield.
- Corruptor: Skeletons with poison damage, kite them away. Shadow refuge + Electrofield.
- Cog pack: Lure the minions and kill the shaman. Shadow refuge + Electrofield.
- Stone clans: (the ones that use ''Shatter the Flesh'') Kill the leader so he doesn't explodes dead bodies. Shadow Refuge + Electrofield.
- Cultist (physical damage with throwing hammers, really annoying. Shadow refuge and use Electrofield on them.
- Bloodfire rogue: (high phys damage, be careful) Shadow refuge + kite with Electrofield.
- Black Knight: (high phys damage) Shadow refuge + kite with Electrofield.
- Steelfur Titan: (high phys damage and hp) They can stunlock you (Bitchslaps pls, sthap). Use Shadow refuge + kite with Electrofield.
Stuff to look for through the entire Terror diff:
- High level runes: IX, RHA, XAR.
- Any base item (sacred) for shrine crafting. You gotta find the lowest rank of each (cap, leather gloves, sash, etc..) and Bladed shield (Sacred) + Katar (Sacred) [Both iLVL 99] for shrine crafting.
- Any set item that we don't need for signets. Same goes for any useless unique jewel/amulet/ring/quiver, free stat signets.
- All rare jewels/amulets/rings.
- Any unique for ACrystals.
- Any Perfect emerald(XP POT) and Perfect ruby(MF POT).
- All the Sacred/Ornate shrines you can find. Pick up all the other ones in case you can trade with other players for these 2.
- Belladona's elixir and apples.
► Act 2

You should be around level 70-75~. Now you can go to the Sewers and level up/farm a bit there (Your act5 hatred merch will carry you as long as you keep spamming Limpet Lasers). After getting some levels you can go to progress through the act. (Don't forget going back to Hatred and completing the Ennead Challenge before you overlevel 80)
Don't forget picking up the Monster token (Act 2 - Fairy Witch: Canyon of the Mages) and the Boss token (Dogma of Pain).
Mobs to look out for and how to counter them:
Keep in mind that mobs are the same, only change is more HP/DMG/RES%.
- Pest: Careful with their Cast on Death cluster bomb, it deals good fire damage. With ETH belt RW you should be fine. Use fireball sentry and don't stand on top of the fire.
- Corruptor Mage: Poisonous skeleton mages, they poison you and can cause your death really quick, just use your pots and fireball sentry, stay away from them as much as you can.
- The pack These little wolves are annoying as hell, if you get surrounded by the pack you're dead/stun locked. Use fireball sentry and stay away from them.
- Grubber: Same as the cave snappers, but more deadly. Electrofield them and kite to avoid melee/poison flash.
- Ice clan: Again, be careful with the leader and his Shatter the flesh, since we have low resistances.
- Shredder: Careful with the electric ball, it can deal good amount of damage if you're not paying attention.
Stuff to look for through the entire Terror diff:
- High level runes: IX, RHA, XAR.
- Any base item (sacred) for shrine crafting. You gotta find the lowest rank of each (cap, leather gloves, sash, etc..) and Bladed shield (Sacred) + Katar (Sacred) [Both iLVL 99] for shrine crafting.
- Any set item that we don't need for signets. Same goes for any useless unique jewel/amulet/ring/quiver, free stat signets.
- All rare jewels/amulets/rings.
- Any unique for ACrystals.
- Any Perfect emerald(XP POT) and Perfect ruby(MF POT).
- All the Sacred/Ornate shrines you can find. Pick up all the other ones in case you can trade with other players for these 2.
- Belladona's elixir and apples.
► Act 3

Starting act 3 you should be around level 80~, proceed to get the Khalim relics and kill Mephisto. Don't forget to finish +20 HP pot from the figurine and the Lam Esen's Tome for +5 to stats on your way.
Also, don't forget picking up the Monster token (Act 3 - Glowing Blob: From Travincal to Durance of Hate Level 2) and the Boss token (Dogma of Hatred).
Mobs to look out for and how to counter them:
Keep in mind that mobs are the same, only change is more HP/DMG/RES%.
- Black death: These zombies got high poison damage, careful with them. Since they are melee, just kite.
- Djins: These 4 sword fellas makes you teleport when they hit you, really annoying and dangerous, since you can jump on top of a big pack.
- Ni va: They are the bluish crocodiles that cast the immunity shield (you cant kill mobs). I don't think there's much to add about these guys. Try to kill them before they cast the shield, or simply run away until its duration goes off.
- Monkey King: Harambe is back and is blood thirsty. These monkeys throw barrels that deals high damage, you better keep moving or you'll die.
- Moon Knight: They will jump on top of you dealing high phys damage, be careful not to blind blink over the walls because of them.
- Que-Hegan & Peace warder: Sneaky little bastards, dealing high physical damage (they are invisible until attacking). You cant really do much vs them, just move and cast a sentry while moving to avoid them and kill the summoners (Que-hegans)
Stuff to look for through the entire Terror diff:
- High level runes: IX, RHA, XAR.
- Any base item (sacred) for shrine crafting. You gotta find the lowest rank of each (cap, leather gloves, sash, etc..) and Bladed shield (Sacred) + Katar (Sacred) [Both iLVL 99] for shrine crafting.
- Any set item that we don't need for signets. Same goes for any useless unique jewel/amulet/ring/quiver, free stat signets.
- All rare jewels/amulets/rings.
- Any unique for ACrystals.
- Any Perfect emerald(XP POT) and Perfect ruby(MF POT).
- All the Sacred/Ornate shrines you can find. Pick up all the other ones in case you can trade with other players for these 2.
- Belladona's elixir and apples.
► LC2

First challenge on Terror difficulty, used to be known as Binding of Baal (now is simply claled Death Projector or Level Challenge 2. It's a bit harder for some classes(MeleeQQ) but don't worry, you can do it!
What do I need for this uber?
- Maximum level 90.
- Terror Act3 → Flayer Jungle → Swampy Pit Level 3.
- Where is it located? here! I recommend opening a portal on the safe blue circle zone.
- Any perfect gem ready to cube with your class charm.
- Gear I used: TU6 2x Spellgrip, TU3
 Spellgrip
Wrist Blade (4)
(Assassin Only)
Required Level: 2
Required Dexterity: 20
Item Level: 1
Innate Lightning Damage: (10.0% of Dexterity)
5% Chance to cast level 10 Hunting Banshee on Melee Attack
+1 to Assassin Skill Levels
5% Attack Speed
5% Cast Speed
Adds 5-6 Lightning Damage
-2% to Enemy Fire Resistance
-2% to Enemy Lightning Resistance
-2% to Enemy Cold Resistance
+(11 to 15) to Energy
Elemental Resists +(3 to 5)%
Socketed (1)
(Assassin Only)
Required Level: 20
Required Dexterity: 39
Item Level: 31
Innate Lightning Damage: (15.0% of Dexterity)
10% Chance to cast level 18 Hunting Banshee on Melee Attack
+2 to Assassin Skill Levels
15% Attack Speed
15% Cast Speed
Adds 14-20 Lightning Damage
-4% to Enemy Fire Resistance
-4% to Enemy Lightning Resistance
-4% to Enemy Cold Resistance
+(21 to 25) to Energy
Elemental Resists +(9 to 11)%
Socketed (2)
(Assassin Only)
Required Level: 39
Required Dexterity: 83
Item Level: 51
Innate Lightning Damage: (20.0% of Dexterity)
15% Chance to cast level 26 Hunting Banshee on Melee Attack
+3 to Assassin Skill Levels
25% Attack Speed
25% Cast Speed
Adds 40-60 Lightning Damage
-8% to Enemy Fire Resistance
-8% to Enemy Lightning Resistance
-8% to Enemy Cold Resistance
+(31 to 35) to Energy
Elemental Resists +(15 to 17)%
Socketed (2)
(Assassin Only)
Required Level: 48
Required Dexterity: 169
Item Level: 77
Innate Lightning Damage: (25.0% of Dexterity)
20% Chance to cast level 38 Hunting Banshee on Melee Attack
+4 to Assassin Skill Levels
30% Attack Speed
30% Cast Speed
Adds 120-160 Lightning Damage
-12% to Enemy Fire Resistance
-12% to Enemy Lightning Resistance
-12% to Enemy Cold Resistance
+(36 to 40) to Energy
Elemental Resists +(18 to 20)%
Socketed (3)Queen of Glass, TU4 Queen of Glass
Ancient Armor (4)
Defense: (315 - 344) to (630 - 688)
Required Level: 11
Required Strength: 33 to 34
Item Level: 29
15% Cast Speed
-(6 to 8)% to Enemy Elemental Resistances
+(18 to 29)% Enhanced Defense
+(76 to 125) to Mana
Lightning Resist +(21 to 25)%
Cold Resist +(21 to 25)%
Requirements -(11 to 15)%
Socketed (2)
Defense: (899 - 969) to (1718 - 1852)
Required Level: 30
Required Strength: 57 to 60
Item Level: 40
25% Cast Speed
-(11 to 13)% to Enemy Elemental Resistances
+(41 to 52)% Enhanced Defense
+(176 to 225) to Mana
Lightning Resist +(31 to 35)%
Cold Resist +(31 to 35)%
Requirements -(21 to 25)%
Socketed (4)
Defense: (2084 - 2224) to (3911 - 4173)
Required Level: 47
Required Strength: 175 to 186
Item Level: 67
35% Cast Speed
-(16 to 18)% to Enemy Elemental Resistances
+(64 to 75)% Enhanced Defense
+(276 to 325) to Mana
Lightning Resist +(41 to 45)%
Cold Resist +(41 to 45)%
Requirements -(31 to 35)%
Socketed (5)
Defense: (3013 - 3202) to (5650 - 6005)
Required Level: 54
Required Strength: 323 to 344
Item Level: 85
40% Cast Speed
-(18 to 20)% to Enemy Elemental Resistances
+(75 to 86)% Enhanced Defense
+(326 to 375) to Mana
Lightning Resist +(46 to 50)%
Cold Resist +(46 to 50)%
Requirements -(36 to 40)%
Socketed (6)Aerin Orbiterand the other runewords from early/mid game. Aerin Orbiter
Belt (4)
Defense: (88 - 96) to (121 - 132)
Required Level: 5
Required Strength: 28
Item Level: 10
5% Cast Speed
+(4 to 5)% to Fire Spell Damage
+(4 to 5)% to Lightning Spell Damage
+(4 to 5)% to Cold Spell Damage
+(18 to 29)% Enhanced Defense
+(11 to 15) to Energy
Elemental Resists +(3 to 5)%
Elemental/Magic Damage Reduced by (3 to 5)
Socketed (1)
Defense: (310 - 334) to (389 - 419)
Required Level: 22
Required Strength: 56
Item Level: 31
15% Cast Speed
+(8 to 9)% to Fire Spell Damage
+(8 to 9)% to Lightning Spell Damage
+(8 to 9)% to Cold Spell Damage
+(41 to 52)% Enhanced Defense
+(21 to 25) to Energy
Elemental Resists +(9 to 11)%
Elemental/Magic Damage Reduced by (9 to 11)
Socketed (2)
Defense: (754 - 805) to (938 - 1001)
Required Level: 40
Required Strength: 201
Item Level: 51
25% Cast Speed
+(12 to 13)% to Fire Spell Damage
+(12 to 13)% to Lightning Spell Damage
+(12 to 13)% to Cold Spell Damage
+(64 to 75)% Enhanced Defense
+(31 to 35) to Energy
Elemental Resists +(15 to 17)%
Elemental/Magic Damage Reduced by (15 to 17)
Socketed (2)
Defense: (1104 - 1173) to (1358 - 1443)
Required Level: 48
Required Strength: 402
Item Level: 77
30% Cast Speed
+(14 to 15)% to Fire Spell Damage
+(14 to 15)% to Lightning Spell Damage
+(14 to 15)% to Cold Spell Damage
+(75 to 86)% Enhanced Defense
+(36 to 40) to Energy
Elemental Resists +(18 to 20)%
Elemental/Magic Damage Reduced by (18 to 20)
Socketed (2)
- Death Projector shots a spinning Mind Flay (yes, the paladin skill) in a clockwise/anticlockwise direction.
- In order to kill it, keep dodging the ray while casting your spells on the DP. Keep the mechanics (the untargetable mobs that deal high physical damagae) close to the boss, because they remove it's shield. You can lure away the big pack and bring back only 1-2 mechanics. Just keep circling, and don't worry, the ray will always go clock-wise, easy to predict.
- Once you killed it you'll get a swirl, as always, you have a timer to upgrade the charm (30 seconds), and if you die you'll lose it. Cube the CC with the Perfect Gem and voilà! Now it's upgraded

► Act 4

Starting Act 4 you should be around level 85~, proceed to Diablo and be careful with the monster density, is really problematic. For the Izual quest, either skip it (recomended) or do it really slow, since the mob density slows you down.
Mobs to look out for and how to counter them:
- Hellcat: These damn cats will lock your ranged skills, leaving you defenseless vs the mobs, run away from their debuff or/and kill them ASAP.
- Heretics: Heretics deal high physical/magical (don't remember which one) damage. Only way to counter them is Shadow refuge and running away from the hammers.
- Mutilator: These guys deal high magical damage in a cone. Be careful with them!
- Knight of death: Immune to both, fire and lightning. T
- High density mob packs: Nothing much to say here, just progress safe/slow or just rush it (which I usually do)
Stuff to look for through the entire Terror diff:
- High level runes: IX, RHA, XAR.
- Any base item (sacred) for shrine crafting. You gotta find the lowest rank of each (cap, leather gloves, sash, etc..) and Bladed shield (Sacred) + Katar (Sacred) [Both iLVL 99] for shrine crafting.
- Any set item that we don't need for signets. Same goes for any useless unique jewel/amulet/ring/quiver, free stat signets.
- All rare jewels/amulets/rings.
- Any unique for ACrystals.
- Any Perfect emerald(XP POT) and Perfect ruby(MF POT).
- All the Sacred/Ornate shrines you can find. Pick up all the other ones in case you can trade with other players for these 2.
- Belladona's elixir and apples.
► Act 5

Starting Act 5 you should be around level 90~, proceed to the Ancients and be careful with the monster density (it's even higher in this Act). For the Anya quest, it's always good having that extra resistance%. For the Ancients we'll use the same strategy as before, but this time using IX RW shield (you should have one by now). Baal should die insta by spamming the Limpets Laser against the same spot of a wall + Skeleton summons.
Mobs to look out for and how to counter them:
Keep in mind that mobs are the same, only change is more HP/DMG/RES%.
- Mutilator: Same as Act 4, carefull with these winged mobs that cast a magic damage cone. High damage.
- Ghost phoenix: Invisible vultures with high phys damage and immune to fire. Just Electrofield their assess.
- Blood Prince: This fire frogs cast fire nova proc on death. It can even cause you lag!
- Deathfire Bearer: Another elite mob that will annoy you with high damage/hp.
- Detonators: You dont really need this mob on the list to know that it can 1 shot you (33/66/100% on H/T/D difficulties.
- Stone Hammer Demon: These guys throw at you the only two things you dont like in life. Showers and rocks. Combine them and you'll have their main skill. On top of that, immune to fire. Electrofield them before you die.
- Skull clan: Same as always, kill the shaman and no problems.
- Trap Rats: High physical damage. Electrofield them.
- Unseelie Lady: High damage, they cast burning veil buffing everyone's damage(not yours, ofc)
- Black Ice demon: Another elite with high damage, immune to Lightning.
- Thunderling and Thunterling Shamans: Immune to lightning and really annoying because big mob packs.
- Alpha Centaur: High damage elite mob, they jump on top of you and rekt easy.
- Mahasattva: Casts a circle of fire on death (Its a 1 hit ko, so avoid it)
- Serafiend: Another high physical damage elite mob, they too jump on top of you (with a bone prison) and hit you hard.
- Others: There are more mobs that you should be looking out for, but listing all of them would make this long and boring, and with this basic list you have your ass covered for the most part. Last words would be ''avoid getting caught in the middle of mob packs'' and ''avoid/kite all elites''.
Stuff to look for through the entire Terror diff:
- High level runes: IX, RHA, XAR.
- Any base item (sacred) for shrine crafting. You gotta find the lowest rank of each (cap, leather gloves, sash, etc..) and Bladed shield (Sacred) + Katar (Sacred) [Both iLVL 99] for shrine crafting.
- Any set item that we don't need for signets. Same goes for any useless unique jewel/amulet/ring/quiver, free stat signets.
- All rare jewels/amulets/rings.
- Any unique for ACrystals.
- Any Perfect emerald(XP POT) and Perfect ruby(MF POT).
- All the Sacred/Ornate shrines you can find. Pick up all the other ones in case you can trade with other players for these 2.
- Belladona's elixir and apples.
Extra:
► Veteran Monster Tokens

They can be found at the end of each act on Terror and Destruction, kill them and recollect the Tokens.
Where can I found them?
- Act1 - Clawstorm Terror: From The Barracks to Catacombs Level 3.
Act 2 - Fairy Witch: Canyon of the Mages.
Act 3 - Glowing Blob: From Travincal to Durance of Hate Level 2.
Act 4 - Landmass: City of the Damned to River of Flame.
Act 5 - Bane Hunter: Worldstone Keep Level 1-3.
► Show Spoiler
Clawstorm Terror - Act 1
Fairy Witch - Act 2
Glowing Blob - Act 3
Landmass - Act 4
Bane Hunter - Act 5


The five tokens look exactly the same

► Show Spoiler
Cube your class charm once with all five different tokens to receive additional bonuses.
[Class Charm] + each of the 5 tokens → returns [Class Charm] with added bonuses
[Class Charm] + each of the 5 tokens → returns [Class Charm] with added bonuses
► Act Boss Tokens

Just kill each Act Boss on Terror or Destruction to collect each of the five tokens (3 sets of each).
► Show Spoiler
Each of the 5 tokens → Signet of Skill. You can do this up to 3 times (3+ Skill points)
► Minigames

There are 2 Minigames, complete them in order to get Maximum Skill Level Increased for your character.

► Show Spoiler
What do we need?

[Class Charm] + ETH Rune → returns [Class Charm] with added bonuses
- Any summon minion skill, you can use Choronzon,

 Choronzon
Assassin Claws
'SurTal'
Runeword Level: 75
+2 to Assassin Skill Levels
20% Cast Speed
+20% to Physical/Magic Spell Damage
Slows Attacker by (15 to 20)%
10% to Energy
Regenerate Mana +15%
+(20 to 25) Life after each Kill
4% Reanimate as: Random Monster
+(40 to 50) Life when Struck by an EnemyDar-Al-Harbor even
 Dar-Al-Harb
Assassin Shields
'FalUm'
Runeword Level: 58
+(3 to 4) to Assassin Skill Levels
15% Cast Speed
0.25% to Fire Spell Damage (Based on Character Level)
0.25% to Lightning Spell Damage (Based on Character Level)
+(16 to 19) to Summon Darklings
+(19 to 22) to Skeletal Flayer
+25 to Dexterity
5% to Dexterity
+25 to Energy
Elemental Resists +10%Fallentooth Fallentooth
Heavy Crossbow (4)
Two-Hand Damage: (18 - 21) to (32 - 41)
Required Level: 8
Required Strength: 91
Item Level: 29
Strength Damage Bonus: (0.11 per Strength)%
15% Attack Speed
+(8 to 13) to Maximum Damage
(3 to 5)% Life stolen per Hit
+(24 to 43)% Enhanced Damage
+(2 to 6) to Summon Fallen
(7 to 10)% to Strength
Fire Resist +(21 to 25)%
Lightning Resist +(21 to 25)%
Socketed (2)
Two-Hand Damage: (54 - 60) to (93 - 107)
Required Level: 28
Required Strength: 134
Item Level: 40
Strength Damage Bonus: (0.11 per Strength)%
25% Attack Speed
+(18 to 23) to Maximum Damage
(9 to 11)% Life stolen per Hit
+(64 to 83)% Enhanced Damage
+(12 to 16) to Summon Fallen
(15 to 18)% to Strength
Fire Resist +(31 to 35)%
Lightning Resist +(31 to 35)%
Socketed (4)
Two-Hand Damage: (140 - 153) to (221 - 244)
Required Level: 47
Required Strength: 260
Item Level: 67
Strength Damage Bonus: (0.11 per Strength)%
35% Attack Speed
+(28 to 33) to Maximum Damage
(15 to 17)% Life stolen per Hit
+(104 to 123)% Enhanced Damage
+(22 to 26) to Summon Fallen
(23 to 26)% to Strength
Fire Resist +(41 to 45)%
Lightning Resist +(41 to 45)%
Socketed (5)
Two-Hand Damage: (192 - 208) to (281 - 307)
Required Level: 54
Required Strength: 514
Item Level: 85
Strength Damage Bonus: (0.11 per Strength)%
50% Attack Speed
+(33 to 38) to Maximum Damage
(18 to 20)% Life stolen per Hit
+(124 to 143)% Enhanced Damage
+(27 to 31) to Summon Fallen
(27 to 30)% to Strength
Fire Resist +(46 to 50)%
Lightning Resist +(46 to 50)%
Socketed (6) - Patience.
[Class Charm] + ETH Rune → returns [Class Charm] with added bonuses

► Show Spoiler
What do we need?
[Class Charm] + LEM Rune → returns [Class Charm] with added bonuses
- Any summon minion skill, you can use Choronzon,Choronzon
Assassin Claws
'SurTal'
Runeword Level: 75
+2 to Assassin Skill Levels
20% Cast Speed
+20% to Physical/Magic Spell Damage
Slows Attacker by (15 to 20)%
10% to Energy
Regenerate Mana +15%
+(20 to 25) Life after each Kill
4% Reanimate as: Random Monster
+(40 to 50) Life when Struck by an EnemyDar-Al-Harbor evenDar-Al-Harb
Assassin Shields
'FalUm'
Runeword Level: 58
+(3 to 4) to Assassin Skill Levels
15% Cast Speed
0.25% to Fire Spell Damage (Based on Character Level)
0.25% to Lightning Spell Damage (Based on Character Level)
+(16 to 19) to Summon Darklings
+(19 to 22) to Skeletal Flayer
+25 to Dexterity
5% to Dexterity
+25 to Energy
Elemental Resists +10%FallentoothFallentooth
Heavy Crossbow (4)
Two-Hand Damage: (18 - 21) to (32 - 41)
Required Level: 8
Required Strength: 91
Item Level: 29
Strength Damage Bonus: (0.11 per Strength)%
15% Attack Speed
+(8 to 13) to Maximum Damage
(3 to 5)% Life stolen per Hit
+(24 to 43)% Enhanced Damage
+(2 to 6) to Summon Fallen
(7 to 10)% to Strength
Fire Resist +(21 to 25)%
Lightning Resist +(21 to 25)%
Socketed (2)
Two-Hand Damage: (54 - 60) to (93 - 107)
Required Level: 28
Required Strength: 134
Item Level: 40
Strength Damage Bonus: (0.11 per Strength)%
25% Attack Speed
+(18 to 23) to Maximum Damage
(9 to 11)% Life stolen per Hit
+(64 to 83)% Enhanced Damage
+(12 to 16) to Summon Fallen
(15 to 18)% to Strength
Fire Resist +(31 to 35)%
Lightning Resist +(31 to 35)%
Socketed (4)
Two-Hand Damage: (140 - 153) to (221 - 244)
Required Level: 47
Required Strength: 260
Item Level: 67
Strength Damage Bonus: (0.11 per Strength)%
35% Attack Speed
+(28 to 33) to Maximum Damage
(15 to 17)% Life stolen per Hit
+(104 to 123)% Enhanced Damage
+(22 to 26) to Summon Fallen
(23 to 26)% to Strength
Fire Resist +(41 to 45)%
Lightning Resist +(41 to 45)%
Socketed (5)
Two-Hand Damage: (192 - 208) to (281 - 307)
Required Level: 54
Required Strength: 514
Item Level: 85
Strength Damage Bonus: (0.11 per Strength)%
50% Attack Speed
+(33 to 38) to Maximum Damage
(18 to 20)% Life stolen per Hit
+(124 to 143)% Enhanced Damage
+(27 to 31) to Summon Fallen
(27 to 30)% to Strength
Fire Resist +(46 to 50)%
Lightning Resist +(46 to 50)%
Socketed (6) - Patience.
[Class Charm] + LEM Rune → returns [Class Charm] with added bonuses
► Black Road Challenge

This is the last challenge on Terror, 2 of the 5 stages are a bit difficult without lvl 120, and Act 3 merch (fully geared with Honorifics on Sacred base items with Defense%, TotalCharacterDefense% and fire spell damage%). I'm gonna list the stages ordered by difficulty:

► Show Spoiler
1)Trial of Greed:
- This is the easiest one, you need 666.666 gold on your body (not on the stash) and just transmute your charm alone in the cube. [Class Charm]→ returns [Class Charm] with note of completion (Greed)

► Show Spoiler
2)Trial of Fear:
- For this uber, summon & kill ''The Butcher'' (uber) on Terror. He is located at The Hole Level 2 (Act 1: Black Marsh). His mechanics are quite simple, ultra high damage(if not 1HKO) and completely immune. There's a chance(20%) that he casts a red pentragram on hit/attack. To kill him, just bring summons (use your IX rw on assassin shield to get skeletons/darkling summons) and keep casting/letting your meatshield die for the pentagram to appear. Wait for him to stand on top of the red pentagram in order to damage/kill him.
[Class Charm] → returns [Class Charm] with note of completion (Fear)

► Show Spoiler
3) Trial of Contrition:
- Another summon uber on terror, this time you gotta kill Shaman King Koth, located at Act 5: Arreat Summit. Like Tal Rasha, minions give immunity shield to their boss, kill them before going for him. Summon a bunch of your skeletons and use your Electrofield/Limpet laser in one spot before summoning. Then, avoid their missiles while casting your skills. Cube the charm while you have the swirls.
[Class Charm] → returns [Class Charm] with note of completion (Contrition)

► Show Spoiler
4)Trial of Blood:
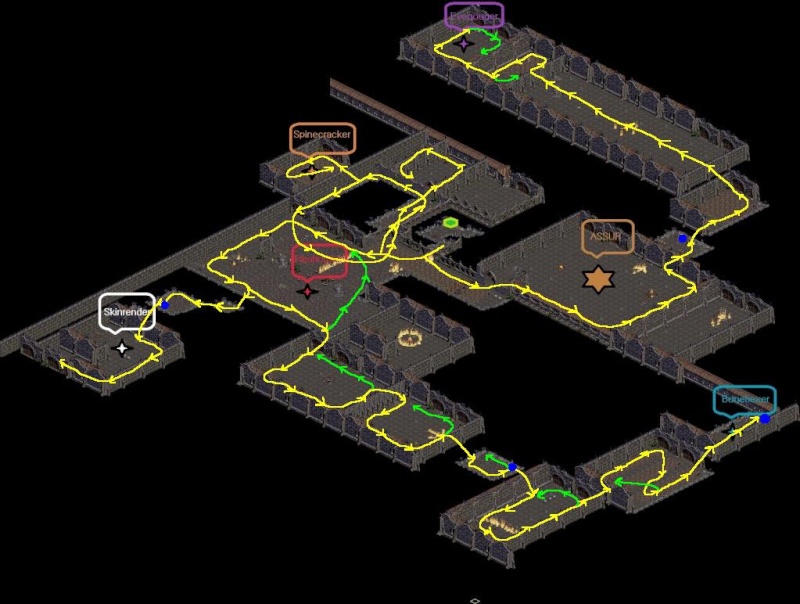
- This time you gotta kill 2 Priestesses from LC1(TranAthulua) but in Terror difficulty, Skovos(ice) and Zerae(thunder). The thing is, after you kill one, you have only 30 seconds to kill the other one and cube the charm. The timer starts to tick down after the first kill.
HOW THE F*** DO I DO THAT? First, you clear all the area but the priestesses you need to kill, then, jump over the wall and kill both. MAP!
[Class Charm] → returns [Class Charm] with note of completion (Blood)

► Show Spoiler
5)Trial of Knowledge:
- You will need level 120 and Act 3 merch (fully geared with Honorifics on Sacred base items with Defense%, TotalCharacterDefense% and fire spell damage%). You'll need also the Late Game gear[Farming] (which you'll need to finish some easy ubers and farm a bit for it) with 2x Gehenna (we are gonna use Limpet Laser for this ones + Phase bomb).
- Good stats: Life after kill, faster cast rate, -EnemyResist%, +faster hit recovrey%, +faster run/walk% and +Element Spell damage %.
- A good map like this one → MAP
- TONS of patience and not jumping/walking into big packs.
[Class Charm] + Alpha/Beta/Gamma/Delta/Epsilon brains → returns [Class Charm] with note of completion (Knowledge)
 [5]
[5]Well, you did it. You are gonna know what Median XL is all about, 95% of its content is here. Get ready to die!
P.S: Make sure to check the Ubers section for the complete information about the Ubers.
► MP VIDEOS
Here we'll have only the videos from the stream for Destruction difficulty (Playlist will include all Walkthrough in order). On each Act section I'll put only the youtube parts from SP, so you guys have both. On multimedia you got the full compilation of them. They are posted as well on my Somnus's Lair.
On twitch:
On Youtube! (some parts were removed by youtube):
► Act 1
Once we get to Destruction we should be level 105~ (you can go to TCow now and get 120) , our goal here is do the easy Ubers and go to Andariel (while we do the Easy Ubers).
First of all, we'll go to Infernal Machine, then we'll go do the last Act 1 uber, the Butcher. After this, proceed to Andariel like usual.
Mobs to look out for and how to counter them:
Keep in mind that mobs are the same, only change is more HP/DMG/RES%. With tiefling form you're gonna get 1-shot by high physical damage dealers (since we have 0 defense it all goes to the avoid/block/HP)
- Cave snappers: Kite them away, don't stay in melee or you'll get poison flashed. Shadow refuge + Electrofield.
- Corruptor: Skeletons with poison damage, kite them away. Shadow refuge + Electrofield.
- Cog pack: Lure the minions and kill the shaman. Shadow refuge + Electrofield.
- Stone clans: (the ones that use ''Shatter the Flesh'') Kill the leader so he doesn't explodes dead bodies. Shadow Refuge + Electrofield.
- Cultist (physical damage with throwing hammers, really annoying. Shadow refuge and use Electrofield on them.
- Bloodfire rogue: (high phys damage, be careful) Shadow refuge + kite with Electrofield.
- Black Knight: (high phys damage) Shadow refuge + kite with Electrofield.
- Steelfur Titan: (high phys damage and hp) They can stunlock you (Bitchslaps pls, sthap). Use Shadow refuge + kite with Electrofield.
Stuff to look for through the entire Destruction diff:
- Any base item (sacred) for shrine crafting. You gotta find the lowest rank of each (cap, leather gloves, sash, etc..) and Bladed shield (Sacred) + Katar (Sacred) [Both iLVL 99] for shrine crafting and making our Runewords.
- Any set item/sacred unique that we don't need/want for signets. Same goes for any useless unique jewel/amulet/ring/quiver, free stat signets.
- All rare jewels/amulets/rings.
- Any unique for ACrystals.
- Any Perfect emerald(XP POT) and Perfect ruby(MF POT).
- All the Sacred/Ornate shrines you can find. Pick up all the other ones in case you can trade with other players for these 2.
- Belladona's elixir and apples(for HP regen boost).
► Act 2
In Act 2 we got 2 easy ubers we can do with the TU6 we got. We'll rush the act and we'll get to Lost City, we'll do Horazon's Focus and the binding of Baal. After this, proceed as usual.
Mobs to look out for and how to counter them:
Keep in mind that mobs are the same, only change is more HP/DMG/RES%. With tiefling form you're gonna get 1-shot by high physical damage dealers (since we have 0 defense it all goes to the avoid/block/HP)
- Pest: Careful with their Cast on Death cluster bomb, it deals good fire damage. With ETH belt RW you should be fine. Use fireball sentry and don't stand on top of the fire.
- Corruptor Mage: Poisonous skeleton mages, they poison you and can cause your death really quick, just use your pots and fireball sentry, stay away from them as much as you can.
- The pack These little wolves are annoying as hell, if you get surrounded by the pack you're dead/stun locked. Use fireball sentry and stay away from them.
- Grubber: Same as the cave snappers, but more deadly. Electrofield them and kite to avoid melee/poison flash.
- Ice clan: Again, be careful with the leader and his Shatter the flesh, since we have low resistances.
- Shredder: Careful with the electric ball, it can deal good amount of damage if you're not paying attention.
Stuff to look for through the entire Destruction diff:
- Any base item (sacred) for shrine crafting. You gotta find the lowest rank of each (cap, leather gloves, sash, etc..) and Bladed shield (Sacred) + Katar (Sacred) [Both iLVL 99] for shrine crafting and making our Runewords.
- Any set item/sacred unique that we don't need/want for signets. Same goes for any useless unique jewel/amulet/ring/quiver, free stat signets.
- All rare jewels/amulets/rings.
- Any unique for ACrystals.
- Any Perfect emerald(XP POT) and Perfect ruby(MF POT).
- All the Sacred/Ornate shrines you can find. Pick up all the other ones in case you can trade with other players for these 2.
- Belladona's elixir and apples(for HP regen boost).
► Act 3
In Act 3 we have Death Projector and Akarat, really Easy Ubers. Other than that, proceed through to Mephisto (which has a chance% of dropping sacred uniques) as usual.
Mobs to look out for and how to counter them:
Keep in mind that mobs are the same, only change is more HP/DMG/RES%. With tiefling form you're gonna get 1-shot by high physical damage dealers (since we have 0 defense it all goes to the avoid/block/HP)
- Black death: These zombies got high poison damage, careful with them. Since they are melee, just kite.
- Djins: These 4 sword fellas makes you teleport when they hit you, really annoying and dangerous, since you can jump on top of a big pack.
- Ni va: They are the bluish crocodiles that cast the immunity shield (you cant kill mobs). I don't think there's much to add about these guys. Try to kill them before they cast the shield, or simply run away until its duration goes off.
- Monkey King: Harambe is back and is blood thirsty. These monkeys throw barrels that deals high damage, you better keep moving or you'll die.
- Moon Knight: They will jump on top of you dealing high phys damage, be careful not to blind blink over the walls because of them.
- Que-Hegan & Peace warder: Sneaky little bastards, dealing high physical damage (they are invisible until attacking). You cant really do much vs them, just move and cast a sentry while moving to avoid them and kill the summoners (Que-hegans)
Stuff to look for through the entire Destruction diff:
- Any base item (sacred) for shrine crafting. You gotta find the lowest rank of each (cap, leather gloves, sash, etc..) and Bladed shield (Sacred) + Katar (Sacred) [Both iLVL 99] for shrine crafting and making our Runewords.
- Any set item/sacred unique that we don't need/want for signets. Same goes for any useless unique jewel/amulet/ring/quiver, free stat signets.
- All rare jewels/amulets/rings.
- Any unique for ACrystals.
- Any Perfect emerald(XP POT) and Perfect ruby(MF POT).
- All the Sacred/Ornate shrines you can find. Pick up all the other ones in case you can trade with other players for these 2.
- Belladona's elixir and apples(for HP regen boost).
► Act 4
There are no Ubers in this Act, Diablo has a chance to drop Sacred Uniques (in case you want to farm here a bit), other than that, this act is a waste of time. Beware of it big density, this act has a lot of strong mobs.
Mobs to look out for and how to counter them:
- Keep in mind that mobs are the same, only change is more HP/DMG/RES%. With tiefling form you're gonna get 1-shot by high physical damage dealers (since we have 0 defense it all goes to the avoid/block/HP)
- Hellcat: These damn cats will lock your ranged skills, leaving you defenseless vs the mobs, run away from their debuff or/and kill them ASAP.
- Heretics: Heretics deal high physical/magical (don't remember which one) damage. Only way to counter them is Shadow refuge and running away from the hammers.
- Mutilator: These guys deal high magical damage in a cone. Be careful with them!
- Knight of death: Immune to both, fire and lightning. T
- High density mob packs: Nothing much to say here, just progress safe/slow or just rush it (which I usually do)
Stuff to look for through the entire Destruction diff:
- Any base item (sacred) for shrine crafting. You gotta find the lowest rank of each (cap, leather gloves, sash, etc..) and Bladed shield (Sacred) + Katar (Sacred) [Both iLVL 99] for shrine crafting and making our Runewords.
- Any set item/sacred unique that we don't need/want for signets. Same goes for any useless unique jewel/amulet/ring/quiver, free stat signets.
- All rare jewels/amulets/rings.
- Any unique for ACrystals.
- Any Perfect emerald(XP POT) and Perfect ruby(MF POT).
- All the Sacred/Ornate shrines you can find. Pick up all the other ones in case you can trade with other players for these 2.
- Belladona's elixir and apples(for HP regen boost).
► Act 5
This Act has the highest difficulty/density of all clod locations. Ubers like Khalimgrad, lord Alric Jitan, Island of the Sunless sea, Assault on mount Arreeat are easy for our ElectrofieldSentry (you can also use LimpetLaser, results are the same). Proceed through the Act like usual, pick up the WP's, we'll need them later.
Mobs to look out for and how to counter them:
Keep in mind that mobs are the same, only change is more HP/DMG/RES%. With tiefling form you're gonna get 1-shot by high physical damage dealers (since we have 0 defense it all goes to the avoid/block/HP)
- Mutilator: Same as Act 4, carefull with these winged mobs that cast a magic damage cone. High damage.
- Ghost phoenix: Invisible vultures with high phys damage and immune to fire. Just Electrofield their assess.
- Blood Prince: This fire frogs cast fire nova proc on death. It can even cause you lag!
- Deathfire Bearer: Another elite mob that will annoy you with high damage/hp.
- Detonators: You dont really need this mob on the list to know that it can 1 shot you (33/66/100% on H/T/D difficulties.
- Stone Hammer Demon: These guys throw at you the only two things you dont like in life. Showers and rocks. Combine them and you'll have their main skill. On top of that, immune to fire. Electrofield them before you die.
- Skull clan: Same as always, kill the shaman and no problems.
- Trap Rats: High physical damage. Electrofield them.
- Unseelie Lady: High damage, they cast burning veil buffing everyone's damage(not yours, ofc)
- Black Ice demon: Another elite with high damage, immune to Lightning.
- Thunderling and Thunterling Shamans: Immune to lightning and really annoying because big mob packs.
- Alpha Centaur: High damage elite mob, they jump on top of you and rekt easy.
- Mahasattva: Casts a circle of fire on death (Its a 1 hit ko, so avoid it)
- Serafiend: Another high physical damage elite mob, they too jump on top of you (with a bone prison) and hit you hard.
- Others: There are more mobs that you should be looking out for, but listing all of them would make this long and boring, and with this basic list you have your ass covered for the most part. Last words would be ''avoid getting caught in the middle of mob packs'' and ''avoid/kite all elites''.
Stuff to look for through the entire Destruction diff:
- Any base item (sacred) for shrine crafting. You gotta find the lowest rank of each (cap, leather gloves, sash, etc..) and Bladed shield (Sacred) + Katar (Sacred) [Both iLVL 99] for shrine crafting and making our Runewords.
- Any set item/sacred unique that we don't need/want for signets. Same goes for any useless unique jewel/amulet/ring/quiver, free stat signets.
- All rare jewels/amulets/rings.
- Any unique for ACrystals.
- Any Perfect emerald(XP POT) and Perfect ruby(MF POT).
- All the Sacred/Ornate shrines you can find. Pick up all the other ones in case you can trade with other players for these 2.
- Belladona's elixir and apples(for HP regen boost).
After finishing all these Easy Ubers and Destruction, it's time to proceed to farm a bit. You gotta be able to farm Terror Fauztinville and Destruction Tran Athulua (LC1). If you want, you can try Destruction Nilathak for signets (and maybe SU's). Before we proceed any further, you should have:
- All Quests from Hatred, Terror and Destruction (A1Q1, A2Q1, A3Q1&Q3, A4Q1, A5Anya).
- All Minigames, veteran tokens and Dogmas (Act boss tokens).
- You and your BloodMage(act3 fire merc) should be level 120, all gear should be upgraded (TU6'ed if you have any Tiered Uniques), MO'ed and socketed (go IotSs for gold, 1m each run in destruction)
- Breakpoints achieved (FHR%, FCR%, etc)
Once we have the Late game gear (farming Terror Fauztinville and Tran Athulua for Sacred/Ornate shrines and sacred base items) we can proceed to the rest of Ubers.
W.I.P | Will list them etc etc, need a break. BRB!


 →
→ 


